PROXIMA HIBERNATUS_PLUS alarm

AvtoAd
30/09/2022
Content
1. About PROXIMA HIBERNATUS_PLUS signaling .
2. How to set the PROXIMA HIBERNATUS_PLUS alarm .
3. PROXIMA HIBERNATUS_PLUS emergency signaling lights .
4. Service mode .
5. Emergency shutdown of the PROXIMA HIBERNATUS_PLUS alarm.
6. PROXIMA HIBERNATUS_PLUS alarm setup scheme.
Alarm for two-wheeled transport PROXIMA HIBERNATUS_PLUS
HIBERNATUS_PLUS motorcycle alarm is characterized by a very low current consumption - 0.4 mA, so it is ideal for installation in any two-wheeled vehicle. The main advantage of the PROXIMA HIBERNATUS_PLUS alarm is the position sensor located directly in the control panel, which responds to the longitudinal and transverse tilt of the motorcycle. It is available in two pilot versions (mini remote control, soft remote control).
The model has the following features:
- Remote variable code (Keeloq).
- Single circuit blockade.
- Emergency disarmament is possible.
- Checking the battery status of the remote control.
- Service status.
- Memory of the last 10 sources of alarm.
- Electronic protection of turn signal and siren outputs against short circuit.
- Blinking of the LED when receiving a signal from the remote control.
- Quiet/loud setting and disarming the alarm.
- Automatic setting of the protection mode.
- One-time rejection of the automatic setting of the protection mode.
- The possibility of turning off the additional sensor using the remote control.
- The possibility of programming 4 remotes.
- Very low power consumption during normal operation with the receiver on.
- Low battery indication on remote control and low motorcycle battery .
How to set the PROXIMA HIBERNATUS_PLUS alarm
The alarm can be turned on automatically after 1-3 or 5 minutes after turning off the ignition - (automatic protection activation) or only when the user presses the remote control button - (manual protection activation).
Automatic protection activation
You can program the time of automatic arming. After turning off the ignition and the expiration of the selected time (standard 1-3 or 5 minutes ), the alarm is automatically turned on. Confirmation of protection activation is a short-term flashing of the turning indicators.
Silent mode: After the ignition is turned off and before the selected time (1-3 or 5 minutes) expires, pressing the button on the remote control activates the alarm . Confirmation of arming is a short-term flashing of the turn indicators.
Loud mode: After turning off the ignition and before the selected time (1-3 or 5 minutes) has passed, pressing the remote control button will sound the alarm. Confirmation of the protection activation is a short flashing of the turn indicators and a short signal of the siren.
One-time refusal of automatic activation of the security mode: If you do not want the alarm to turn on automatically, press the button to cancel arming (confirmation of removal from auto-arming will be a flash of the turn indicators). After the ignition is turned off again, the alarm will be automatically set again, unless you cancel automatic arming by pressing the remote control button again.
Manual activation of protection
Silent mode: When the ignition is off, pressing the remote control button will activate the alarm. Confirmation of arming is the flashing of the turn indicators.
Loud mode: When the ignition is off, pressing the remote control button will activate the alarm. Arming is confirmed by flashing turn signals and a siren.
IMPORTANT: If a low battery remote control is used to arm the alarm, the arming mode will not be activated. Also, there will be no automatic reactivation. Battery discharge is additionally signaled by eight short siren signals.
Emergency signal lights PROXIMA HIBERNATUS_PLUS
If the ignition is on and the alarm is disarmed, pressing the button on the remote turns the hazard warning lights on/off. If the remote control is lost while the emergency alarm is on, you can turn off the emergency alarm with five turns of the ignition switch, this is also a manual transition to the service state. If the alarm is armed, then a service code is used to disable the alarm and emergency light signaling, which also puts the alarm into the service state. When the emergency light alarm is on, you can set the alarm.
Service mode
If you don't want the alarm to be active (for example, the bike is coming back to the workshop), you can put the alarm into service state. In this state, the alarm behaves as if it did not occur.
The alarm goes into service state:
- after pressing both remote control buttons with the ignition on, when the alarm is disarmed,
- after turning the ignition on and off five times quickly when the alarm is disarmed,
- automatically when the battery voltage drops below approximately 10 V,
- when the correct EMERGENCY CODE has been entered.
Entering and exiting the service status is signaled by turning on the turn indicators and turning on the siren for 2 seconds. In service mode, when the ignition is off, the LED does not light up. After turning on the ignition, the LED flashes every 0.5 s. If the service mode is caused by a battery voltage drop, the siren additionally flashes every second when the ignition is on. When the service mode is caused by a drop in battery voltage, when the voltage rises above about 10 V, the alarm automatically returns to the state from which it entered service. Exiting the service mode occurs after pressing any button on the remote control with the ignition on (of course, when the battery is charged).
Emergency disconnection of the PROXIMA HIBERNATUS_PLUS alarm
NOTE: The EMERGENCY CODE must be different from the factory CODE 1111.
If it is not possible to turn off the alarm with the remote control, and we have the ignition key and know the emergency code (except 1111), we can put the alarm into working condition. To enter the emergency CODE, turn the ignition on and off and wait 30 seconds until the beeping stops. After the alarm (30s), quickly 5 times - within 10s - turn the ignition on and off - after some time the LED will start generating 9 flashes, from which the first digit of the code should be selected. Pulses must be counted. The selection turns on and turns off the ignition as soon as you see a pulse that corresponds to the first digit of the code. Now the LED will start generating 9 flashes. After flashing the number corresponding to the second digit of the code, turn the ignition on and off. Then the LED will start to generate 9 flashes, after the flash with the number corresponding to the third digit of the code, turn the ignition on and off. And finally, now the LED will start generating 9 flashes, after the flash with the number corresponding to the fourth digit of the code, the ignition is turned on and off. After entering the code correctly, the alarm goes into service state. Entering the service status is signaled by turning indicators lighting up and siren activation for 2 seconds. If the code was entered incorrectly, the ignition will remain on for more than 3 seconds or the entry of any number is skipped - the alarm will go off again. After the alarm, you can re-enter the EMERGENCY CODE.
Important : The factory CODE 1111 does not work as an emergency CODE, for the emergency CODE to be active, it must be changed to any other. The setting range is from 1111 to 9999. Programming the EMERGENCY CODE 1111 means refusing to disarm using the EMERGENCY CODE.
How to configure PROXIMA HIBERNATUS_PLUS alarm
You can change the alarm settings:
1. Choose the time after which the alarm will automatically turn on after turning off the ignition: after 1 - 3 - 5 minutes. Or don't turn it on at all.
2. Set the tilt detection level to 10-20-30 degrees or no level change detection.
3. Set low, medium, high or startup detection level.
4. Register key fobs (max. 4).
5. Change the emergency code - you can disable the use of the service code by programming the emergency code 1111.
Changing the auto arming time
In working condition, quickly turn the ignition on and off 10 times. The confirmation of entering the setting mode is the turning on of the direction indicators for 1.5 seconds. Then, every 2 seconds the alarm activates the siren and the LED diode in five groups. The number of flashes and siren signals depends on the group number - from one LED flash and siren signal to five LED flashes and siren signal. After the one-time signal of the siren and LEDs, turn the ignition on and off. Then the siren and the LED flash five times every 2 seconds. Turning the ignition on and off, for example, after the second beep of the siren and LED will set the auto-arm time to 3 minutes. The alarm does not exit the configuration mode, returns to the main menu and activates the siren and LED five times every 2 seconds, allowing you to switch to one of the five configuration options. If the ignition is not turned on after any siren and LED signal, the alarm returns to service mode.
Change the tilt/shock detection level
In working condition, quickly turn the ignition on and off 10 times. The confirmation of entering the setting mode is the turning on of the direction indicators for 1.5 seconds. Then, every 2 seconds the alarm activates the siren and the LED diode in five groups. After the double (pitch) or triple (knock) signal of the siren and LEDs, turn the ignition on and off. The siren and LEDs then flash four times every 2 seconds. Turning the ignition on and off, for example, after the second beep of the siren and LED will set 20 tilt detection / medium impact detection. The alarm does not exit configuration mode, returns to the main menu and activates the siren and LED five times every 2 seconds, allowing you to go to one of five configuration options. If the ignition is not turned on after any siren and LED signal, the alarm returns to service mode.
Registration of pilots
In working condition, quickly turn the ignition on and off 10 times. The confirmation of entering the setting mode is the turning on of the direction indicators for 1.5 seconds. Then, every 2 seconds the alarm activates the siren and the LED diode in five groups. After four beeps of the siren and LEDs, only the ignition is turned on. From now on, the alarm system is waiting for remote control registration. After pressing any button on the remote, it will be programmed. The confirmation is the lighting of the LED and the activation of the siren for 0.5 seconds. Exiting the remote control programming procedure occurs after registering 4 remote controls, turning off the ignition, or 10 seconds after registering the last remote control.
Changing the emergency code
In working condition, quickly turn the ignition on and off 10 times. The confirmation of entering the setting mode is the turning on of the direction indicators for 1.5 seconds. After five sound signals of the siren and the LED, turn the ignition on and off. Then the siren and the LED will flash nine times. Turning the ignition on and off, for example, after the fourth siren beep, and the LED sets the first digit of the emergency code to four. Then the siren and the LED will flash nine times. Turning the ignition on and off after, say, the third siren beep, and the LED sets the second digit of the emergency code to three. Then the siren and the LED will flash nine times. Turning the ignition on and off after, for example, the second beep of the siren and LED sets the third digit of the emergency call code to two.
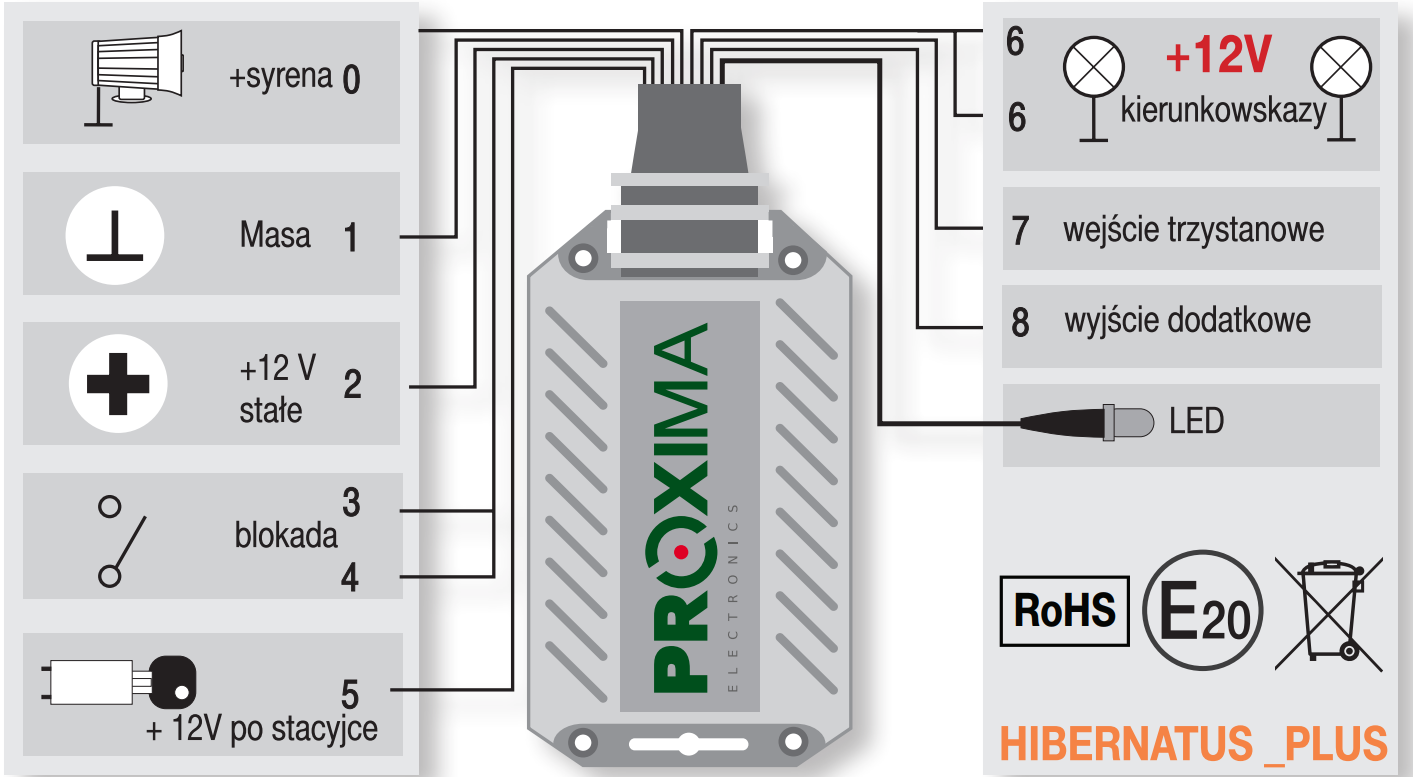
PROXIMA HIBERNATUS_PLUS alarm setup scheme
Read also:
Car alarm system PROXIMA AUTOALARM BP5
Car alarm system PROXIMA ZKC 24V
PROXIMA ZK car alarm system
Car alarm system PROXIMA ZN